Tor v3
 @FVPNS

 82822222
 EN
EN RU
RU


Настройка Shadowsocks для работы с OpenVPN на Ubuntu 24.04 Debian 12
NOTICE: dual-stack mode for '--proto udp' does not work correctly with '--socks-proxy'
Дання инструкция только для TCP конфига
1. Установка shadowsocks-libev - в терминале нужно выполнить команду
sudo apt update ; sudo apt install shadowsocks-libev shadowsocks-v2ray-plugin resolvconf -yy
2. Далее необходимо отредактирова файл конфигурации выполнив команду в терминале
sudo nano /etc/shadowsocks-libev/config.json
3. Таблица ип адресов
+--------------------+-----------------+
| server_short_title | server_ip  |
+--------------------+-----------------+
| DE                 | 217.182.199.126 |
| US                 | 147.135.36.162  |
| CA                 | 66.70.179.236   |
| FR                 | 46.105.107.231  |
| GB                 | 185.253.98.234 |
| NL                 | 92.38.186.85    |
| LU                 | 92.38.162.11    |
| SG                 | 139.99.68.157   |
| MD                 | 178.175.139.202 |
| RO                 | 86.105.25.218   |
| IT                 | 91.193.5.90     |
| SP                 | 195.206.107.202 |
| RU                 | 95.213.164.11   |
| UA                 | 193.106.31.98   |
| PA                 | 190.97.163.213  |
| HK                 | 193.239.86.18   |
| TR                 | 31.210.70.186   |
| US3                | 147.135.11.223  |
| PL                 | 79.137.69.34    |
| SE                 | 185.247.71.106  |
| AT                 | 91.132.139.66   |
| BE                 | 37.120.143.202  |
| CH                 | 152.89.162.138  |
| US2                | 5.181.234.58    |
| CY                 | 134.255.210.26   |
| RS                 | 89.38.224.2     |
| RU2                | 5.188.163.34    |
| AU                 | 51.161.128.135  |
| FI                 | 95.216.15.25    |
| NL-AllServers      | 92.38.186.19 |
| DE-AllServers      | 49.12.133.171   |
| LV                 | 188.92.78.249   |
| RU4                | 176.123.175.242 |
+--------------------+-----------------+
4. Из списка выше, нужно выбрать ип по server_short_title, которая указана первая в названии конф файла.
Пароль для копипаста
5. Скриншот пример для RO подписки, где RO является сервером для подключения и первым в файл конфигурации подписки, пример ниже
- Пароль для копипаста
Y0YWhQ4sACO3 - порт для копипаста
587
{ "server":["134.255.210.26"], "mode":"tcp_only", "server_port":587, "local_port":10080, "password":"Y0YWhQ4sACO3", "timeout":86400, "method":"chacha20-ietf-poly1305", "no_delay": true, "fast_open": false, "reuse_port": true, "workers": 4, "plugin": "ss-v2ray-plugin", "plugin_opts": "tls;host=specialsseason.com"}

Далее закрываем редактор nano командой CTRL+X, нажимем Y, подтверждаем Enter
Далее выполняем блок команд
sudo sed -i 's/ss-server/ss-local/g' /lib/systemd/system/shadowsocks-libev.service ; sudo systemctl daemon-reload; sudo service shadowsocks-libev restart; sudo service shadowsocks-libev status
Результат как на скрине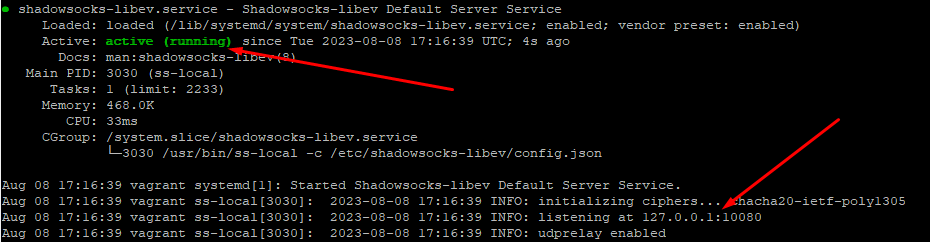
shadowsocks-libev
Из личног окабинета скачать файл конфигурации для linux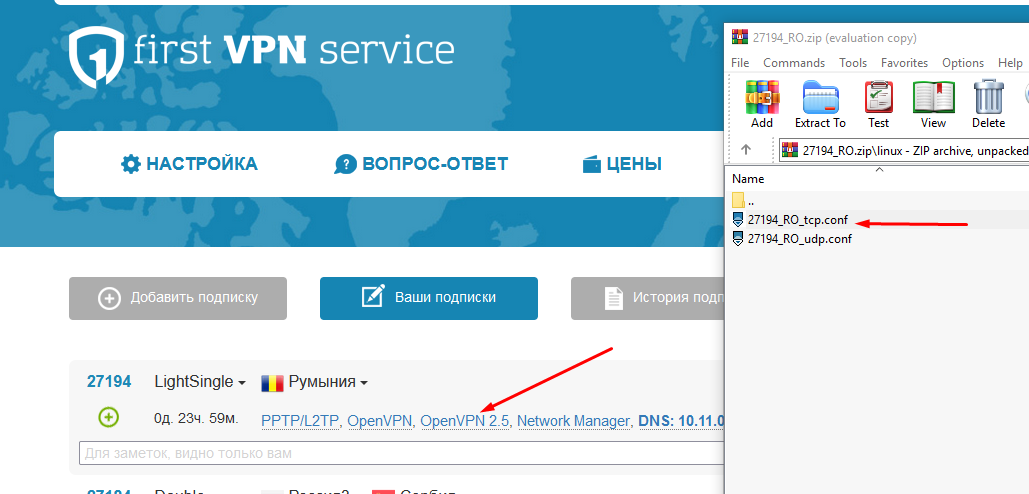
Загрузить файл в директорию /etc/openvpn/client/ под названием 27194_RO_tcp.conf
отредактировать командой sudo nano /etc/openvpn/client/27194_RO_tcp.conf
вписать строкуsocks-proxy 127.0.0.1 10080
добавить ShadowSocks server ip из 3. Таблица ип адресов
route IP_SERVER_SS 255.255.255.255 net_gatewayredirect-gateway def1
connect-retry-max 3
Далее закрываем редактор nano командой CTRL+X, нажимем Y, подтверждаем Enter.
Добавить резолв можно блоком команд из терминала, указав путь к /etc/openvpn/client/27194_RO_tcp.confsudo sed -i -e "15 i script-security 2" /etc/openvpn/client/27194_RO_tcp.confsudo sed -i -e "16 i up /etc/openvpn/update-resolv-conf" /etc/openvpn/client/27194_RO_tcp.confsudo sed -i -e "17 i down /etc/openvpn/update-resolv-conf" /etc/openvpn/client/27194_RO_tcp.conf
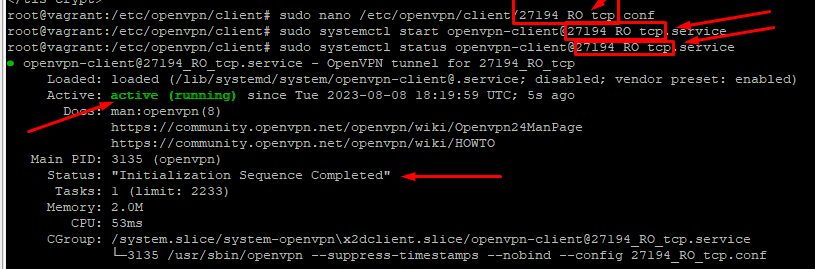
Для запуска openvpn необходимо выполнить командуsudo systemctl start openvpn-client@27194_RO_tcp.service
sudo systemctl status openvpn-client@27194_RO_tcp.service